![Enviar correus HTML amb Acces i Outlook]()
por Pali | May 23, 2012 | Programació
Bon dia!
Alguns recordareu l’article que ja fa temps vaig fer sobre enviar correus amb Access
Avui afegeixo una opció per poder enviar correus, en lloc de en text pla, en HTML, amb la quantitat d’opcions que això dona, no cal que m’esplaií més.
Abans utilitzavem la funció SendMessages
Function SendMessages(Dir As String, CC As String, Asunto As String, TextoMsg As String, Optional AttachmentPath, Optional AttachmentPath2)
Dim OutApp As Outlook.Application
Dim OutMail As Outlook.MailItem

    Set OutApp = CreateObject("Outlook.Application")
    Set OutMail = OutApp.CreateItem(olMailItem)

    With OutMail
    .To = Dir
    .CC = CC
    .BCC = ""
    .Subject = Asunto
    .Body = TextoMsg

    'Se pueden adjuntar ficheros
    If Not IsMissing(AttachmentPath) Then
        .Attachments.Add (AttachmentPath)
    End If
    'Es poden adjuntar 2 adjunts
    If Not IsMissing(AttachmentPath2) Then
        .Attachments.Add (AttachmentPath2)
    End If
    .Send
    '.Display 'tambien se puede usar .Send y lo situa en la bandeja de salida
    End With

Set OutMail = Nothing
Set OutApp = Nothing

End Function
Ara en lloc d’aquesta funció posem la nova amb HTML
CorreuHTML
Function CorreuHTML(Dir As String, CC As String, Asunto As String, TextoMsg As String, Optional AttachmentPath, Optional AttachmentPath2)
Dim OutApp As Outlook.Application
Dim OutMail As Outlook.MailItem

    Set OutApp = CreateObject("Outlook.Application")
    Set OutMail = OutApp.CreateItem(olMailItem)

    With OutMail
    .To = Dir
    .CC = CC
    .BCC = ""
    .Subject = Asunto
    .Body = .HTMLBody
    .HTMLBody = TextoMsg
    .BodyFormat = olFormatHTML

    'Se pueden adjuntar ficheros
    If Not IsMissing(AttachmentPath) Then
        .Attachments.Add (AttachmentPath)
    End If
    'Es poden adjuntar 2 adjunts
    If Not IsMissing(AttachmentPath2) Then
        .Attachments.Add (AttachmentPath2)
    End If
    .Send
    '.Display 'tambien se puede usar .Send y lo situa en la bandeja de salida
    End With

Set OutMail = Nothing
Set OutApp = Nothing

End Function
S’ha de netejar una mica, però per que s’entengui d’on ve aquest codi, per això deixo .body = .HTMLbody
Ara la funció ha canviat lleugerament,
CorreuHTML Correu, "", "Assumpte", "<html><body>hola</body></html>"
Però això és poc pràctic, per tant en lloc de text directament en codi VB el que farem es un textbox on enganxarem tot el codi en el formulari

Ara obrim el nostre editor HTML preferit, fem el nostre correu tot macu i fem copy paste del codi

Ara ja tindrem de la mateixa forma que abans, el nostre correu personalitzat a cada usuari, però amb HTML.
Anex:
Normalment si voleu fer coses «decents», en l’edició del HTML usareu CSS, però realitzant les primeres proves m’he donat conte que depenent del nostre visor, Outlook, Gmail, Hotmail, etc, la forma és diferent.
La primera prova l’he fet amb CSS dins del HTML
<!DOCTYPE html PUBLIC "-//W3C//DTD XHTML 1.0 Transitional//EN" "http://www.w3.org/TR/xhtml1/DTD/xhtml1-transitional.dtd">
<html xmlns="http://www.w3.org/1999/xhtml">
<head>
<meta http-equiv="Content-Type" content="text/html; charset=utf-8" />

<style type="text/css">
<!--
.Color {
	color: #393;
}
.ColorGris {
	color: #999;
}
-->
</style>
</head>

<body>

<p class="Color">Abans d’imprimir  aquest correu, pensi si realment és necessari.El medi ambient es cosa de tots.</p>
<h6 class="ColorGris">Avís Legal:<br />
  La informació continguda en aquest  missatge de correu electrònic és confidencial i està destinada únicament a la  persona a la qual ha estat enviada, pot contenir informació privada i  confidencial. Si vostè no és el destinatari al que ha estat remesa, no pot  copiar-la, distribuir-la, ni emprendre amb ella cap tipus d’acció. Si creu que  ho ha rebut per error, per favor notifiqui-ho al remitent, gràcies.</h6>
<h6 class="ColorGris">Les seves dades estan incloses a la  nostre base de dades, al càrrec de ****, en compliment de la normativa  en la LOPD 15/1999 de 13 de Desembre, inscrit a l’Agència Espanyola de  Protecció de Dades amb codi d’inscripció .
</body>
</html>
D’aquesta forma veiem en Outlook el correu així

Però en canvi en Gmail el veiem així

La sol·lució és utilitzar CSS Inline, en lloc de definir la fulla d’estils al principi en la pròpia línia
<p style="color: #393;">Contingut</p>
No se massa de CSS però segur que també pots, com a possible solució, externalitzar el CSS al web, de la mateixa forma que poses les imatges amb ruta absoluta http://…
Que vagi de gust 🙂
![Enviar correus HTML amb Acces i Outlook]()
por Pali | May 17, 2012 | Hardware
En el procés de muntatge del meu servidor local, vaig trobar per un calaix una antiga controladora, comprada al 2006 sata de 4 ports, la Sunix Sata4000, que sembla el nom de l’escombra de Harry Potter, la nimbus 2000 xD, bromes apart, vaig començar tot emocionat a muntar el meu servidor amb 8 disc durs de 1Tb, per la placa base 4 i per la controladora altres 4.
 La placa base és una P5N32 SE SLI-Deluxe, molt rebentada per fer-li overclock i haver utilitzat refrigeració líquida. Això em donava els meus dubtes de fiabilitat dels components, i per tant no era un exemple fiable on provar la controladora.
Un cop tot muntat i llest per engegar per començar a instal·lar el SO
 I utilitzant la placa abans nombrada..
 Dons resulta que detecta el disc dur a la fase de la BIOS, però es queda parat allà, cosa que no em deixa continuar. Provo amb altres HD’s, tots de més de 137Gb com posa a la caixa, i al final desisteixo.
Desprès d’indagar una mica, he trobat que el problema resideix en la BIOS de la tarja, que monta un xip SiI3114, immediatament visitant la pàgina del fabricant arribem a la conclusió de que és possible que el fimrware obsolet no detecti be els disc durs de més de 137Gb. Dons anem a ello.
La Primera opció és utilitzar la seva utilitat SiFlashTool, cosa que es complicat, ja que has d’obrir una consola de Ms-Dos i configurar aquests parametres
SiFlashTool [/BusNum:xx /DevNum:xx] [/File:filespec] [/v]
Dons vaig a buscar el BusNum, que es la primera variable


 Això que arribant aquí veig la pestanya de «Flash BIOS» i em quedo parat, vaig a fe run cop d’ull
 Aquesta imatge és un cop ja he actualitzat, però la bios que portava era del 2004. Ràpidament vaig a buscar el meu arxiu bios
 I wuala!, reinicio i ja funciona tot 🙂

por Pali | May 8, 2012 | Programació
Bon dia!
Avui m’ha tocat fer la migració d’un blog del servidor remot al local, normalment és al revés, però per variar sempre m’agrada fotrem en fregats jajaj.
Per començar hem d’instal·lar un servidor Apache i SQL local, en aquest cas hem utilitzat el XAMPP que ho porta tot incorporat i és disponible en un idioma llegible :), hi han molts altres packs però això ja va a gust del consumidor.
Un cop tinguem instal·lat l’únic que hem de fer es activar els serveis del sistema de forma que quedin els serveis activats, podeu accedir a aquest panell teclejant http://localhost/xampp un cop feta la instal·lació del programa.
Un cop instal·lat el servidor Apache i el MySql funcionant, anem al nostre hosting per realitzar el backup corresponent. En aquest cas Nominalia.
Anem al panell de control, i seleccionem al nostre opció, Hosting Linux

 Seleccionem «Bases de dades MySQL
 Un cop dins de phpMyAdmin, anem a bases de dades

Dins la base de dades, anem a la pestanya de «Exportar» i executem
 Ara ja tindrem un arxiu amb extensió .sql
 Ara el següent pas és mitjançant el nostre client FTP preferit, en el nostre cas FileZilla, ens baixem tot el contingut del nostre WordPress a la nostre carpeta local, per defecte Xampp s’instal·la a la C, per tant el contingut el posarem dins la carpeta htdocs i li direm wp, C:xampphtdocswp
 Ara un cop tot el contingut, anem a importar la SQL al nostre servidor local, anem a http://localhost/phpmyadmin/ i posem l’usuari (per defecte «root») i la contrasenya, que ens aura demanat just al iniciar Xampp que configurem. Òbviament, és molt recomanable que canviem l’usuari i la contrasenya de la instal·lació, ja que és insegura.

Anem primer a crear la base de dades, li direm wordpress
 Posem el nom i li donem a «Crea»
 Un cop dins anem a importar
 Ara obrim el nostre backup SQL amb el Bloc de Notes i fem el següent
Reemplacem tot el contingut de la base de dades on contingui la direcció del nostre servidor remot per la direcció del servidor local
 Guardem el SQL amb un altre nom, per si de cas, i l’importem al nostre phpMyAdmin local


Ara ja només ens queda modificar el wp-config.php de la nostre carpeta local de WP
 Ara ja està tot llest, només cal que posem http://localhost/wordpress i podrem veure el nostre blog igual que teniem al servidor remot.
Que vagi de gust 🙂
![Enviar correus HTML amb Acces i Outlook]()
por Pali | Abr 24, 2012 | Informàtica
Test de velocitat amb Cesca, amb Fibra 50Mb

A continuació penjo algunes proves més amb la de 100Mb, les primeres proves sense re-iniciar el router, realment usar FTP, servidors i descàrregues directes son brutals. Sense anar més lluny, Blizzard downloader a 11Mb/s, surt més a conte baixar-se un joc que posar-lo al lector de CD

por Pali | Abr 24, 2012 | Hardware
Physical Installation:
|
Critical: Hard drives and Solid State drives (SSD) are highly sensitive precision instruments that read, write, and store information on spinning magnetic disks. Special handling is required to protect hard drives from damage. Hard drives can be damaged by Electrostatic Discharge (ESD). Before handling, please use a grounding strap to protect your hard drive and other electronic computer equipment from ESD damage. |
- Turn the system’s power off
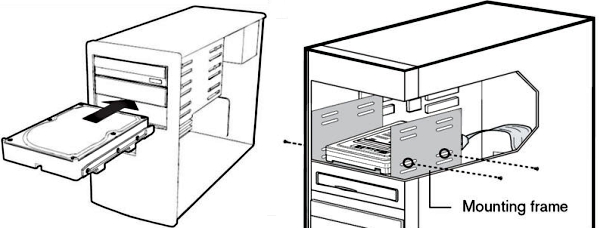
- Mount the drive in the system
- Desktop Drives: The drive can be mounted in a standard 3.5″device bay. The drive can be mounted sideways, on end, or even upside down as long as the mounting screws are used properly. Use either the four bottom screws or four of the side mounting screws to support the drive. This will prevent vibration and provide additional electrical grounding.
- Mobile Drives: Mobile drive installation will vary based on the manufacturing of the system it is being placed in. Please contact your system manufactuer for instructions on mounting your drive in your system.
Return to Top
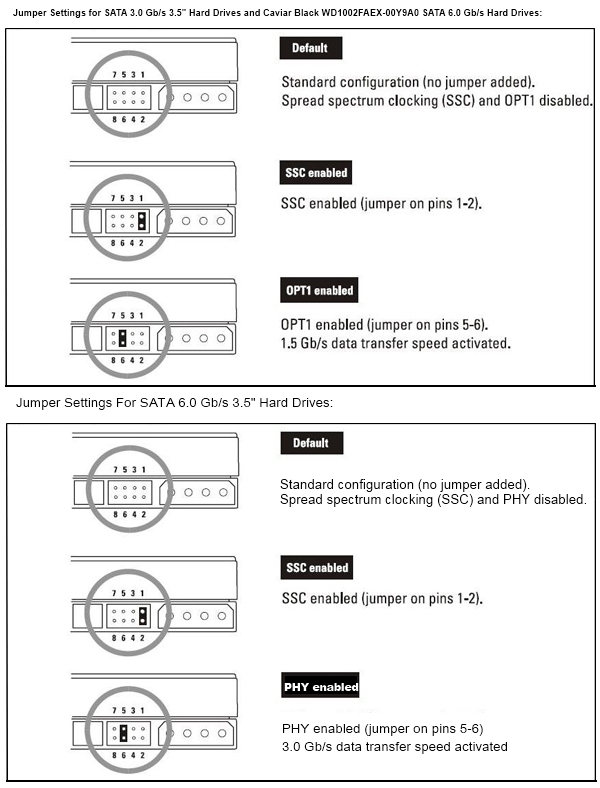
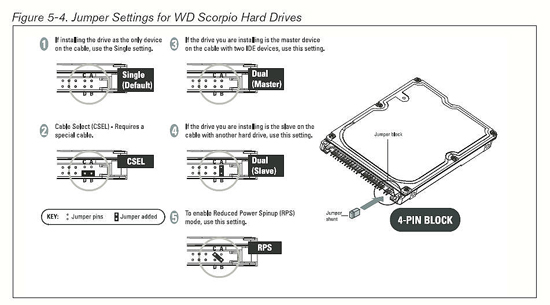
- Set the jumpers
Depending on your drive, your jumper settings will vary. There is generally no need to change the default jumper setting in order to use the drive. Your drive’s label will show the exact jumper settings your drive supports. See the images below for examples of our most common jumper settings.
Serial ATA (SATA) I, II, and 6 Gb/s Hard Drive Jumper Settings for 3.5″ drives:
Important: Caviar Black drives that have a model number of WD1002FAEX-00Y9A0 use the SATA 3.0 Gb/s pin layout – setting Jumpers 5 & 6 on these model drives will enable OPT1 which will set your drive to 1.5 Gb/s. Please Contact Us with any questions or issues with the jumper settings on this model drive.
Return to Top
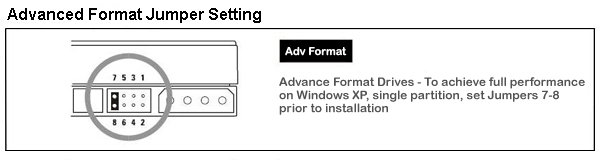
Advanced Format Special Jumper Setting: (for select 3.5″ ADF drives only)
Return to Top
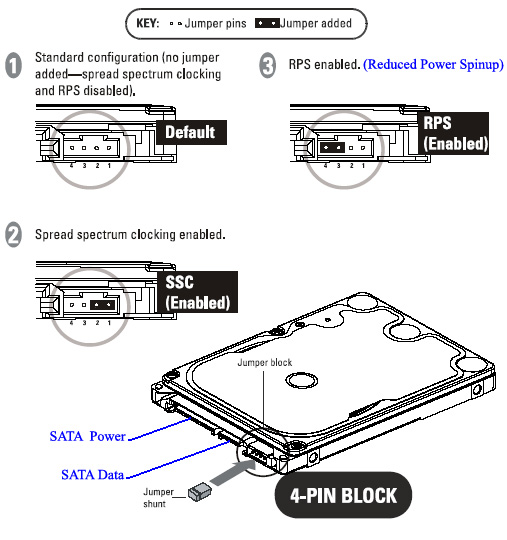
SATA Mobile Hard Drive Jumper Settings:
Return to Top
EIDE (PATA) Desktop Hard Drive Jumper Settings:
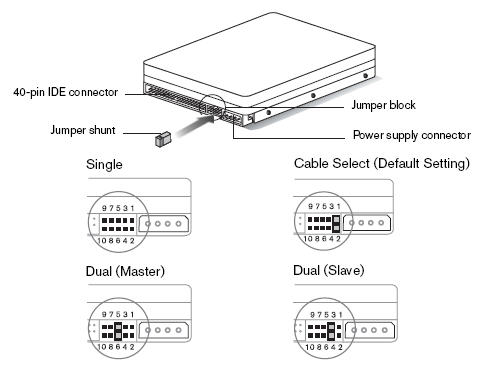
EIDE (PATA) Mobile Hard Drive Jumper Settings:
Return to Top
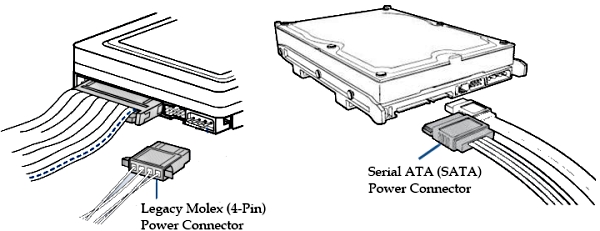
- Attach the power supply cable
To supply power to the drive you may use either the SATA power connector or the legacy ATA-4-pin (Molex) power connector on the back of the drive (see image below).
Important: If your drive has both power connectors, do not connect both the SATA and the legacy ATA power cable to the drive at the same time. This may result in damage to the drive.
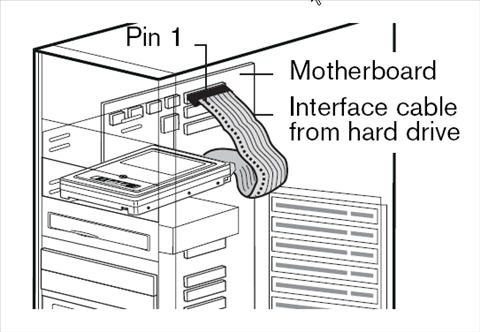
- Attach the EIDE (PATA) or SATA interface cable:
SATA Drives:
The drive can be configured in one of two ways:
- Connected to a SATA host adapter card installed to the system.
- Connected directly to a Serial ATA connector on the motherboard
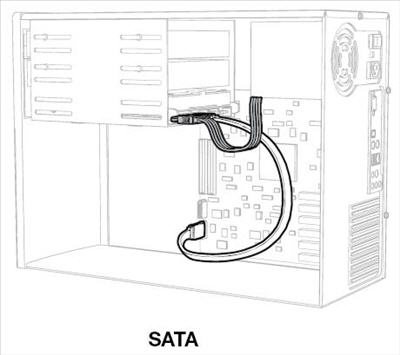
Unlike EIDE cables, either end of a standard SATA cable can be connected to the drive. Once you have connected the cable to the drive, connect the other end into the SATA host adapter card, or the motherboard. SATA interface cables have keyed connectors to prevent incorrect installation. Make sure the cable is no longer than 39 inches to minimize line noise and to remain within the SATA specification.
(This illustration shows the drive being connected the motherboard.)
Return to Top
EIDE (PATA) Drives:
- Connect the EIDE (PATA) Interface Cable to the hard drive(s):
-
- If installing the hard drive as the only drive on the cable:
Connect the black connector of the EIDE (PATA) interface cable to the drive.
- If installing two drives on the same EIDE (PATA) interface cable:
Jumper the bootable drive as Master, and the other drive as Slave; then connect the Master drive to the black connector of the EIDE (PATA) interface cable, and the Slave drive to the gray connector.
- Connect the IDE Interface Cable to the Motherboard:
Attach the blue end of the IDE interface cable to the 40-pin connector on the motherboard. Match pin 1 on the IDE interface cable to the connector on the motherboard.
- Power On Your Computer
- Replace the system cover, reconnect the power cord, and power on the system. At startup, the computer will display all the devices detected on the system.
- If the drive you installed is not detected, restart the computer.
- At startup, run the CMOS Setup program and configure your BIOS so your drive is detected. Your system or motherboard manual should provide these instructions. If it does not you will need to contact your system or motherboard manufactuer for assistance.
- Restart the system to make sure the drive is detected.
- Install your Operating System, or configure your Operating System to see your drive. See the information below for assistance perfoming this step:

